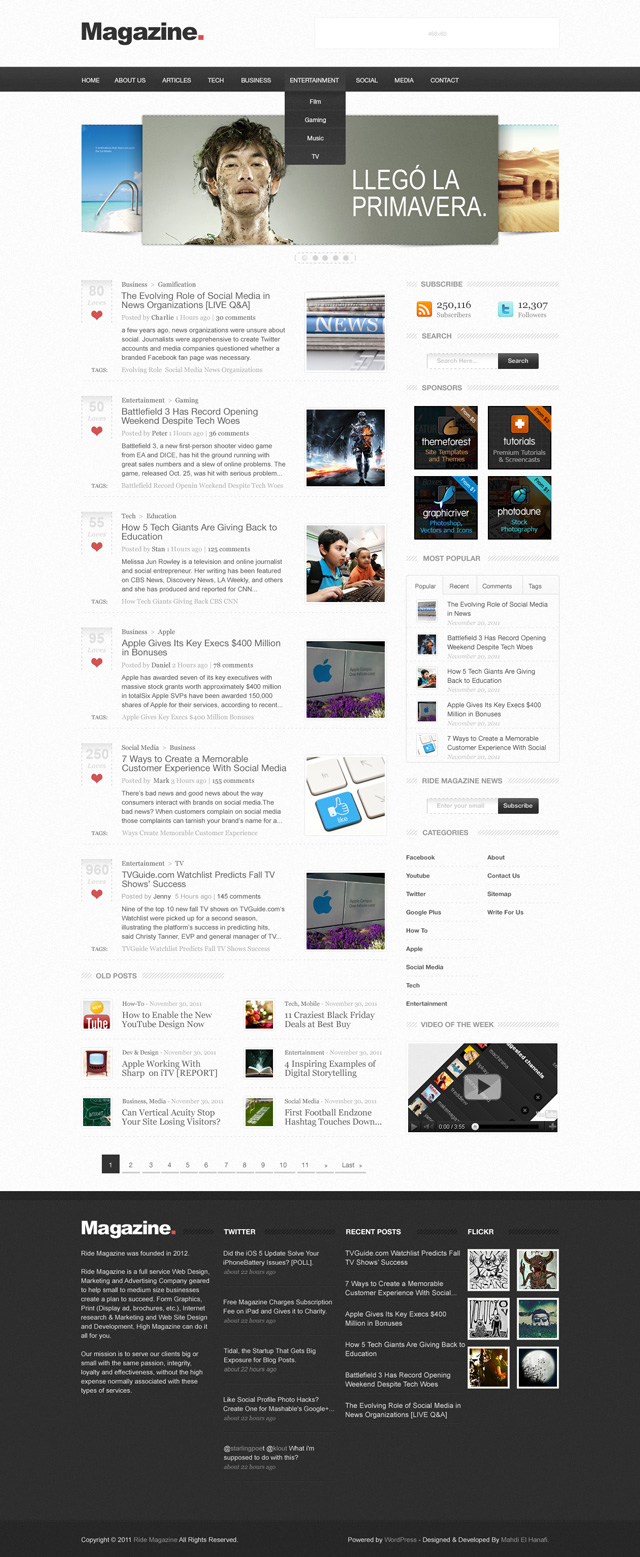
Before we dive in, let me first introduce you to a few resources which will help you out.
The Grid
Using a grid makes it so much easier to align elements and decide on their proportions. In this design, we’ll be using a Baseline Grid created by the awesome guys at Teehan+Lax . It’s a 6px baseline grid coupled with the 960 grid system.Typography
Take it seriously when you choose typefaces. By selecting the right fonts you'll achieve successful design before moving to the next step and coding the template. Here are a couple of articles to help you understand which are the right fonts for your project.- A Beginner’s Guide to Pairing Fonts
- How to Choose a Typeface
- What Font Should I Use?”: Five Principles for Choosing and Using Typefaces
- Choosing the Right Font: A Practical Guide to Typography on the Web
- Choose your web fonts wisely
- On Choosing Type
Anti-Aliasing
Here’s a really excellent article, you have to read this one! I won’t say a single word, except that for body copy (small point sizes) we’ll use Sharp, and for headings (larger point sizes) we’ll use Crisp.Pattern
And a quick download for your .pat collection.Step 1: Setting up the Document
Open up Adobe Photoshop (I use CS5.1, but that's not necessary to follow along). As mentioned above, you'll need to grab a copy of the TeehanLax Baseline Grid. Extract the contents of teehanlax_baseline_grid.zip, open the Teehanlax Baseline Grid folder and drag the grid2.psd into Photoshop.The first thing we're going to do is select all the existing layers in the document and delete them. All, that is, except the "Marks" folder. Once done, lock the Marks folder in the layers panel.


Step 2: Creating the Background
Create a new layer, call it "BG", select Paint Bucket Tool (G), fill the background with this (white) color value: #FFFFFF. Then go to Filter > Noise > Add Noise and apply the following settings to give the background a soft noise effect.- Amount: 3.
- Distribution: Uniform.
- Monochromatic: Check.

Step 3: Creating the Navigation Bar
In order to create the navigation bar, select the Rectangle Tool (U), create a rectangle of 1260x49px but, make sure you already set the color's Box to this color value: #000000.Tip: "If you go into the shape creation options there is a checkbox for “snap to pixels”. Now when you create a shape it will always be crisp as the points never land ‘between’ pixels." - Jeff


Gradient Overlay.
- Blend Mode: Normal.
- Opacity: 100%.
- Gradient Reverse: Check.
- Styler: Linear.
- Angle: 90°.
- Scale: 150%.

- Blend Mode: Normal.
- Opacity: 10%.
- Angle: -90.
- Use global light: Uncheck.
- Distance: 5px.
- Choke: 0%.
- Size: 8px.

- Blend Mode: Normal.
- Opacity: 42%.
- Angle: 90.
- Use global light: Uncheck.
- Distance: 2px.
- Spread: 0%.
- Size: 3px.

Using smart objects means you’re working with reference images. So when working with smart objects, the changes applied to them do not affect the original image. You can even save these effects and swap images. Smart filters are also not permanent effects, but can be edited or removed. Normal filters are irreversible, at least after saving the document. Psdtuts+
In order to apply Smart Filters follow the image below.

- Amount: 1.
- Distribution: Uniform.
- Monochromatic: Check.


- Blend Mode: Normal.
- Opacity: 10%.
- Angle: -90.
- Use global light: Uncheck.
- Distance: 1px.
- Choke: 0%.
- Size: 0px.


- Blend Mode: Normal.
- Opacity: 8%.
- Gradient Reverse: Check.
- Styler: Linear.
- Angle: 90°.
- Scale: 100%.

- Color: #FFFFFF.
- Blend Mode: Normal.
- Opacity: 10%.
- Angle: 90.
- Use global light: Uncheck.
- Distance: 1px.
- Choke: 100.
- Size: 0px.


- Font: Helvetica Neue LT Std.
- Weight: 55 Roman.
- Size: 12px.
- Kerning: Metrics.
- Color: #EBEBEB.
- Anti-Aliasing: Sharp.

Step 4: Creating the Drop-Down Menu
Yep, it's time to create the drop-down menu. Grab the Rounded Rectangle Tool (U), create a Rounded of 147x120px and remember to maintain the quality of the edges as much as possible - pixel perfection!


Gradient Overlay.
- Blend Mode: Normal.
- Opacity: 100%.
- Gradient Reverse: Uncheck.
- Styler: Linear.
- Angle: 90°.
- Scale: 100%.

- Blend Mode: Normal.
- Opacity: 76%.
- Angle: -90.
- Use global light: Uncheck.
- Distance: 2px.
- Spread: 0%.
- Size: 0px.

- Amount: 2.
- Distribution: Uniform.
- Monochromatic: Check.


- Blend Mode: Normal.
- Opacity: 8%.
- Gradient Reverse: Uncheck.
- Styler: Linear.
- Angle: 90°.
- Scale: 100%.

- Color: #FFFFFF.
- Blend Mode: Normal.
- Opacity: 10%.
- Angle: 90.
- Use global light: Uncheck.
- Distance: 1px.
- Choke: 100.
- Size: 0px.


- Font: Helvetica Neue LT Std.
- Weight: 55 Roman.
- Size: 12px.
- Kerning: Metrics.
- Leading: 18px.
- Color: #EBEBEB.
- Anti-Aliasing: Sharp.


Step 5: Create the Logo
Grab the Horizontal Type Tool (T), type the name of your website using the following character settings:- Font: Arial.
- Weight: Black.
- Size: 48px.
- Kerning: Metrics.
- Color: #202020-D55355.
- Anti-Aliasing: Crisp.

Step 6: Create the Header Banner
Use the Rectangular Marquee Tool (M) to create a selection of 468x60px, fill it with this color value: #474747, then apply a Stroke effect.
- Size: 3px.
- Position: Inside.
- Blend Mode: Normal.
- Opacity: 100%.
- Fill type: Color.
- Color: #FFFFFF.


Step 6: Create the Slideshow
Alright, let's get started with the slideshow. Grab the Rectangle Tool (U), create a rectangle of 700x254px, then apply the following settings.
- Color: #000000.
- Blend Mode: Normal.
- Opacity: 50%.
- Angle: 90.
- Use global light: Uncheck.
- Distance: 0px.
- Spread: 0%.
- Size: 5px.


- Blend Mode: Normal.
- Opacity: 31%.
- Scale: 100%
- Link with layer: Check.


- Size: 1px.
- Position: Outside.
- Blend Mode: Normal.
- Opacity: 22%.
- Fill type: Pattern.
- Scale: 100%
- Link with layer: Check.

- Color: #000000.
- Blend Mode: Normal.
- Opacity: 20%.
- Angle: 90.
- Use global light: Uncheck.
- Distance: 0px.
- Spread: 0%.
- Size: 3px.


- Blend Mode: Normal.
- Opacity: 100%.
- Gradient Reverse: Uncheck.
- Styler: Linear.
- Angle: 90°.
- Scale: 100%.

- Color: #000000.
- Blend Mode: Normal.
- Opacity: 12%.
- Angle: 120°.
- Use global light: Check.
- Distance: 2px.
- Choke: 0%.
- Size: 2px.


Editor's note: I've no idea what this UI element is for! We'll put it down to designer's discretion :)


Step 7: Create the Categories
Let's start first with the Love Button. Select Rectangle Marquee Tool (M), create a vertical rectangle of 60px, use the gradient tool to make a transparent shadow.


- Blend Mode: Normal.
- Opacity: 25%.
- Scale: 100%
- Link with layer: Check.


- Font: Arial.
- Weight: Bold.
- Size: 28px.
- Kerning: Metrics.
- Color: #E0E0E0.
- Anti-Aliasing: Sharp.

- Font: Georgia.
- Weight: Bold Italic.
- Size: 21px.
- Kerning: Metrics.
- Color: #E0E0E0.
- Anti-Aliasing: Sharp.


Category.
- Font: Georgia.
- Weight: Bold Italic.
- Size: 13px.
- Kerning: Metrics.
- Color: #5E5E5E.
- Anti-Aliasing: Crips.

- Font: Helvetica Neue LT Std.
- Weight: 55 Roman.
- Size: 18px.
- Kerning: Metrics.
- Leading: 18px.
- Color: #5E5E5E.
- Anti-Aliasing: Crips.

- Font: Georgia.
- Weight: Regular.
- Size: 13px.
- Kerning: Metrics.
- Color: #5E5E5E-#AAAAAA.
- Anti-Aliasing: Crips.

- Font: Arial.
- Weight: Regular.
- Size: 13px.
- Kerning: Metrics.
- Leading: 18px.
- Color: #5E5E5E.
- Anti-Aliasing: Crips.

- Font: Georgia.
- Weight: Regular.
- Size: 11px.
- Kerning: Metrics.
- Color: #5E5E5E.
- Anti-Aliasing: Crips.

- Font: Georgia.
- Weight: Regular.
- Size: 13px.
- Kerning: Metrics.
- Color: #AAAAAA.
- Anti-Aliasing: Crips.


- Size: 3px.
- Position: Inside.
- Blend Mode: Normal.
- Opacity: 100%.
- Fill type: Color.
- Color: #FFFFFF.

- Color: #000000.
- Blend Mode: Normal.
- Opacity: 20%.
- Angle: 90°.
- Use global light: Uncheck.
- Distance: 0px.
- Spread: 0%.
- Size: 3px.


- Blend Mode: Normal.
- Opacity: 10%.
- Scale: 100%
- Link with layer: Check.


Step 8: Create the Old Posts
In order to create the old posts, first grab the Rectangle Tool (U) and create a rectangle of 280x11px.


Pattern Overlay.
- Blend Mode: Normal.
- Opacity: 10%.
- Scale: 100%
- Link with layer: Check.

- Font: Helvetica Neue (TT).
- Weight: Bold.
- Size: 14px.
- Kerning: Metrics.
- Color: #999999.
- Anti-Aliasing: Crisp.


- Blend Mode: Normal.
- Opacity: 10%.
- Scale: 100%
- Link with layer: Check.


- Size: 3px.
- Position: Inside.
- Blend Mode: Normal.
- Opacity: 100%.
- Fill type: Color.
- Color: #FFFFFF.

- Color: #000000.
- Blend Mode: Normal.
- Opacity: 20%.
- Angle: 90°.
- Use global light: Uncheck.
- Distance: 0px.
- Spread: 0%.
- Size: 3px.


- Font: Georgia.
- Weight: Regular.
- Size: 12px.
- Kerning: Metrics.
- Color: #5E5E5E-AAAAAA.
- Anti-Aliasing: Crisp.

- Font: Georgia.
- Weight: Regular.
- Size: 18px.
- Kerning: Metrics.
- Leading: 18px.
- Color: #5E5E5E.
- Anti-Aliasing: Crips.


Step 9: Create the Next page
In order to create the next page, grab the Rectangle Tool (U), create a rectangle of 35x37px, give the layer shape this color value: #333333.

- Font: Helvetica Neue LT Std.
- Weight: 55 Roman.
- Size: 13px.
- Kerning: Metrics.
- Color: #5E5E5E.
- Anti-Aliasing: Crisp.


Step 10: Create the “Social Media” Section
Grab the Rectangle Tool (U), create a rectangle of 300x100px as we did with the old posts section, make an empty space of 100px, then apply the same settings. We'll have this result below.
- Font: Helvetica Neue (TT).
- Weight: Bold.
- Size: 14px.
- Kerning: Metrics.
- Color: #888888.
- Anti-Aliasing: Crisp.


- Font: Georgia.
- Weight: Regular.
- Size: 20px.
- Kerning: Metrics.
- Color: #444444.
- Anti-Aliasing: Crisp.

- Font: Georgia.
- Weight: Regaluar.
- Size: 13px.
- Kerning: Metrics.
- Color: #999999.
- Anti-Aliasing: Crisp.


Step 10: Create the “Search Box” Section
In order to create the search box section, grab the Rounded Rectangle Tool (U), create a rounded shape of 220x31, then apply the following layer style settings.

- Blend Mode: Normal.
- Opacity: 100%.
- Gradient Reverse: Check.
- Styler: Linear.
- Angle: 90°.
- Scale: 100%.

- Size: 1px.
- Position: Inside.
- Blend Mode: Normal.
- Opacity: 22%.
- Fill type: Pattern.
- Scale: 100%
- Link with layer: Check.


- Blend Mode: Soft Light.
- Opacity: 60%.
- Gradient Reverse: Check.
- Styler: Linear.
- Angle: 90°.
- Scale: 100%.


- Amount: 2.
- Distribution: Uniform.
- Monochromatic: Check.

- Font: Helvetica Neue (TT).
- Weight: Bold.
- Size: 12px.
- Kerning: Metrics.
- Color: #D8D8D8.
- Anti-Aliasing: Crisp.

Step 11: Create the “Sponsors” Section
Download or create an advertising banner of 125x125px as you see in the image below.
Step 11: Create the “Most Popular” Section
Grab the Rounded Rectangle Tool (U), create a rounded form of 368x301px, set the fill layer to 0%, then apply following layer style settings to it.
- Color: #000000.
- Blend Mode: Normal.
- Opacity: 28%.
- Angle: 90°.
- Use global light: Uncheck.
- Distance: 0px.
- Spread: 0%.
- Size: 3px.


- Blend Mode: Overlay.
- Opacity: 50%.
- Gradient Reverse: Check.
- Styler: Linear.
- Angle: 90°.
- Scale: 130%.

- Amount: 1.
- Distribution: Uniform.
- Monochromatic: Check.


- Font: Helvetica.
- Weight: Bold.
- Size: 12px.
- Kerning: Metrics.
- Color: #555555.
- Anti-Aliasing: Crisp.


- Size: 2px.
- Position: Inside.
- Blend Mode: Normal.
- Opacity: 100%.
- Fill type: Color.
- Color: #FFFFFF.

- Color: #000000.
- Blend Mode: Normal.
- Opacity: 47%.
- Angle: 90°.
- Use global light: Uncheck.
- Distance: 0px.
- Spread: 0%.
- Size: 2px.


- Font: Helvetica Neue LT Std.
- Weight: 55 Roman.
- Size: 14px.
- Kerning: Metrics.
- Leading: 18px.
- Color: #444444.
- Anti-Aliasing: Crisp.

- Font: Georgia.
- Weight: Italic.
- Size: 12px.
- Kerning: Metrics.
- Color: #C0C0C0.
- Anti-Aliasing: Crisp.


Step 12: Create the “News Subscribe” Section
Make a copy of search box folder and change the name of "Search here" To "Enter your email" and "Search" to "Subscribe". Simple!
Step 13: Create the “Categories and Pages” Section
In order to create the categories and pages section, grab the Horizontal Type Tool (T), type the name of your categories, then apply the following character settings as you see in the image below.- Font: Helvetica Neue (TT).
- Weight: Bold.
- Size: 12px.
- Kerning: Metrics.
- Leading: 36px.
- Color: #5E5E5E.
- Anti-Aliasing: Crisp.

- Font: Helvetica Neue (TT).
- Weight: Bold.
- Size: 12px.
- Kerning: Metrics.
- Leading: 36px.
- Color: #5E5E5E.
- Anti-Aliasing: Crisp.


Step 14: Create the “Video of the week” Section
Grab the Rectangle Tool (U), create a rectangle of 300x181px, add an image to it, then apply the following layer style settings.
- Size: 3px.
- Position: Inside.
- Blend Mode: Normal.
- Opacity: 100%.
- Fill type: Color.
- Color: #FFFFFF.

- Color: #000000.
- Blend Mode: Normal.
- Opacity: 12%.
- Angle: 90°.
- Use global light: Uncheck.
- Distance: 0px.
- Spread: 0%.
- Size: 3px.


Step 15: Creating the Footer Area
Grab the Rectangle Tool (U), create a rectangle of 1260x721, give the layer shape this color value: #2D2D2D, then apply the following setting to it.
- Amount: 1.
- Distribution: Uniform.
- Monochromatic: Check.


- Font: Arial.
- Weight: Black.
- Size: 13px.
- Kerning: Metrics.
- Color: #202020-D55355.
- Anti-Aliasing: Crisp.


- Blend Mode: Normal.
- Opacity: 34%.
- Scale: 100%
- Link with layer: Check.

- Font: Arial.
- Weight: Regular.
- Size: 13px.
- Kerning: Metrics.
- Leading: 18px.
- Color: #E0E0E0.
- Anti-Aliasing: Crisp.

- Font: Helvetica Neue (TT).
- Weight: Bold.
- Size: 14px.
- Kerning: Metrics.
- Color: #FFFFFF.
- Anti-Aliasing: Crisp.

- Font: Arial.
- Weight: Regular.
- Size: 13px.
- Kerning: Metrics.
- Leading: 18px.
- Color: #E0E0E0.
- Anti-Aliasing: Crisp.

- Font: Georgia.
- Weight: Italic.
- Size: 12px.
- Kerning: Metrics.
- Color: #8F8F8F.
- Anti-Aliasing: Crisp.


- Font: Arial.
- Weight: Regular.
- Size: 13px.
- Kerning: Metrics.
- Leading: 18px.
- Color: #E0E0E0.
- Anti-Aliasing: Crisp.


- Font: Arial.
- Weight: Regular.
- Size: 13px.
- Kerning: Metrics.
- Leading: 18px.
- Color: #E0E0E0.
- Anti-Aliasing: Crisp.

- Font: Arial.
- Weight: Regular.
- Size: 13px.
- Kerning: Metrics.
- Leading: 18px.
- Color: #E0E0E0.
- Anti-Aliasing: Crisp.


Comments